 Week 7: Putting It All Together
With using the textbook on chapter 9, "Putting It All Together," I created a possible portfolio website. Some of the examples and codes helped me with the possible portfolio. Screen and print sheet also attached. No CSS style view also works.
I love how it turned out! (:
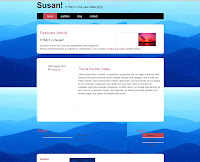
Portfolio
Design Objective:
For the design objective, I added jquery/javascript tab contents in the page, so the content boxes fades or transition every time the tabs are clicked. So instead of making more than one HTML one, I used jquery to put tabs to make separate pages. A smart way. I created a small design of my name to let it known and put it out there. I created the background, so the background won't look as plain. I also added CSS3 to make my page with much more style; CSS3 with rounded corners. I was going to use drop shadows as well, but then it didn't look that good with the tabs content. I tried using a gradient background with CSS3, but it won't show up on my Firefox browser.. The @font-face code is very useful. I like using a font family type that I chose. The font family I used is called QuigleyWiggly. The portfolio page with the gallery has the jquery of image viewer. I like using it because it shows a preview of the images to users. Also, if they like what they see on the images, they can click on the link to view a larger image.
Target Audience:
I target the audience for future employers, teachers, students, and anyone who visits my portfolio page. I set up a portfolio page of a gallery for them to see my recent works and skills. I designed the page to make it user friendly and easy to navigate. Therefore, the viewers will continue to browse through my page.
Smashing Magazine; HTML tutorial
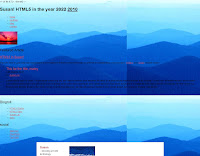
This tutorial was super long. There was just too much coding and following the tutorial. After typing all of the HTML part and half of the CSS sheet, we just started to copy and paste the rest of the codes for CSS. That was tiring! At least near the end, I get good results. I like how the page looks like after. HMTL5 is so different from what I was learning before. However, It does make sense. For examples, nav, footer, and header are like tags I would use for div ids. For article, section, figure, and hgroup, I am yet confused and need to learn more about them. I hope I will understand and continue to learn about HTML5 to help me with my layouts in the future! :)
Here is a preview:
Firefox & IE
Click here for the HTML.
Week 6:
Wired | "How the Web Wins"
Everyday the web browsers and apps change. There's always new things appear. I agree with the author from the article apps are popular. However, I also think that apps can never replace the web. The web is beginning to have more improved ways to use it. Since Css3 and HTML5 came along, for sure the web is getting the rates up high. The design looks even better. The web will always be useful and helpful. As what the article said that the advantages of the web are only growing, I must say that is it true. Even now, some mobile phones have these apps that allow them to access online to the web. That is even more amazing. Such a small screen and only a mobile phone that the user can take the web along anywhere. Businesses can create online billing, banking, and other things on the web now. It's much more easier as well. In the future, the web will continue to have more new things. It will top everything else.
Chapter 5; Indestructible Boxes
I followed the examples on the book and the webpage came out nicely with rounded corners. The book taught us using images for the rounded corners by positioning them to the top right, bottom left, etc. Instead, for my homework website, I used CSS3 for the rounded corners. Print stylesheet also attached on my webpage.
Rounded corners
Single rounded corner
Single rounded corner & Rounded corners:


Chapter 6; No Images? No CSS? No Problem!
In my homework website, I followed those examples. Make the website still works without the fancy styles. To ensure content is still readable, we need to check for these in the websites: CSS, no images, validate, font sizes. We use the 10-second usability test.
No CSS. By going to View > Page Style > No style, the CSS stylesheet will be disabled. Therefore, it will show the website with its content only. The navigations are still visible in bulletpoints. The headers are still in larger size or bolded. Everything is in the page.
No images. Go to the toolbar on top of the browser. Go to Images > Hide Images. For Firefox, go to
Tools > Options > Content > uncheck "Load images automatically"
VALIDATE! This website is a good place to validate your website. Go to http://validator.w3.org/ to validate HTM. For CSS, go to http://jigsaw.w3.org/css-validator/. Make sure your HTML and CSS is validated, so no errors. Be sure to have this in your HTML:
!DOCTYPE html PUBLIC "-//W3C//DTD XHTML 1.0 Transitional//EN" "http://www.w3.org/TR/xhtml1/DTD/xhtml1-transitional.dtd">
Font sizes should be able to scale if a user want to increase the window size. Using px or em should be good.
Week 5;
For the HTML sheet, we attached 2 CSS stylesheets. One for original screen CSS and another for print screen CSS. The real website is on the Zen Garden website.
Print sample
The HTML looks like this:
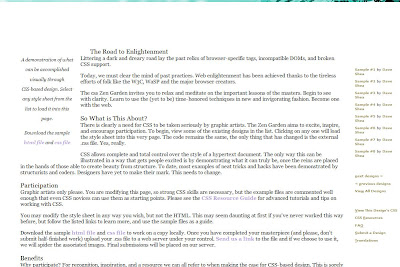
On the CSS, change the header to display:none; so to not display any empty spaces or white space. We also changed the margins to fit the content into places.
This is how print screen looks like:

July 27, 2010; Week 3 -- Subcide Website
 I forgot to blog for every class we meet on Tuesday. Well, last week, we learned divs and how to reconstruct tables to divs. In class we worked on the subcide layout. We didn't finish, but we left off making divs (BEFORE; on the left).
I worked on it more the subcide. Start from this page 2 of tutorial website:
Subcide tutorial
The outcome should look like this page:
http://www.subcide.com/examples/creating-a-css-layout-from-scratch/
This Subcide tutorial is all about divs and CSS. It's a good practice and I learned a lot from this tutorial. Very helpful. It took me awhile to finish because I had trouble having the images and the navigation to work. It turned out exactly just like the website. Finally it's done. :)
It looks like this now (AFTER): My Subcide outcome

Chapter 4: Creative Floating
http://slei89.aisites.com/introweb/week4/ch4.html
I actually took the images from Google, so they look different from the original ones from the book. The gradient, I created myself, following the book. I got the hang of floating the text and images from left to right. Also, I learned a bit of margins and paddings for the content box. However, some parts of the CSS are hard. Codes like [#sweden dd.img img] dd.img within a sweden id and a sweden img id, which are confusing to me. I'm still trying to understand it myself.
Here is how it turned out to look like (on the left), and the code (on the right):

Creative Advices
If you want to be creative for your work, you should follow these advices I'm going to give. I might be helpful for you, yet it might not. It depends on your determination in whether or not you want to become a creative person or artist.
- Being creative, you must have inspirations from anywhere, anything, and anyone.
- THINK. Sit down in a quiet place and start thinking.
- Take a look at examples of other people's work and design, BUT d0 not take/copy their work.
- Have an idea.
- Determined. Get inspired.
- Use your imagination. Expand horizons.
- Share ideas with classmates, friends.
- EAT!! Because you need the energy to think for ideas being creative.
- Be unique. Do something different his time. Don't do the same things like always.
- Music might help for some people.
- Make some sketches, draw, write..
- Test out creativeness with programs.
- Ask for tips/examples from others.
- Have pros or cons on your work, like what works and what don't.
- Check out web design websites for inspirations such as Smashing Magazine
[HOMEWORK]:
Here are the two templates I played with on Dreamweaver. I chose these two templates and insert editable regions by going to Insert > Template Objects > Editable Region. Also, we need to manage sites to be able to save the templates and assets. To open up assets, go to Window > Assets. Click to the icon on the bottom of assets' window and add new library item. I made the footer an asset to use on both templates. For the editable regions, I edit the sidebars and content box. Below are the examples I made:


Templates:
http://slei89.aisites.com/introweb/week4/templates/template1.html
http://slei89.aisites.com/introweb/week4/templates/template2.html
Template files;
http://slei89.aisites.com/introweb/week4/templates/template1.dwt
http://slei89.aisites.com/introweb/week4/templates/template2.dwt
Today, August 3, 2010 [IN CLASS]:
Wow, I can't believe that it's August already. Summer went by fast when there is school. I still think summer break is too short for us. I am still sleepy in the morning. I tried picking afternoon classes.. I want to add a "Read more.." link to my blog, but it won't work. I followed the steps to this blog, but it doesn't work for me. I'll try again later on. Anyways, we showed our reconstruction site in front of the class. After, we learned about templates and adding assets in the library. Templates are not that hard, since Dreamweaver already have some.
P.S. STUDY FOR MIDTERM.
 Week 7: Putting It All Together


